When it comes to testing and buying gold, most pawnshops have already figured out what works best for them. There are a number of options out there for testing gold (and silver) jewelry from the traditional acid test to the more advanced x-ray machines. In this article, we’re going to look at a few options currently being used in pawnshops across the country.
Rare Earth Magnets
Your first line of defense when testing gold should be a good rare earth magnet. Using this highly affordable and readily available tool allows you to quickly identify non-gold items in a large gold scrap lot or when testing a single item.
Using the magnet, run it over the piece(s) you’re looking at testing. Gold, as an element, has no magnetic properties and as such, you should not feel any pull or see pieces moving when you are running the magnet over them. There are of course some exceptions:
- Many clasps have iron springs in them that will be pulled by the magnet – this is to be expected and really doesn’t account for much weight.
- You will also have some hollow earrings that have a metallic rod inserted – be sure to avoid these as you don’t want to pay gold prices for a few grams or pennyweights of iron.
Keeping a good rare earth magnet at the counter can help you quickly identify those fake or plated items to avoid wasting valuable time testing them.
Acid & Stone
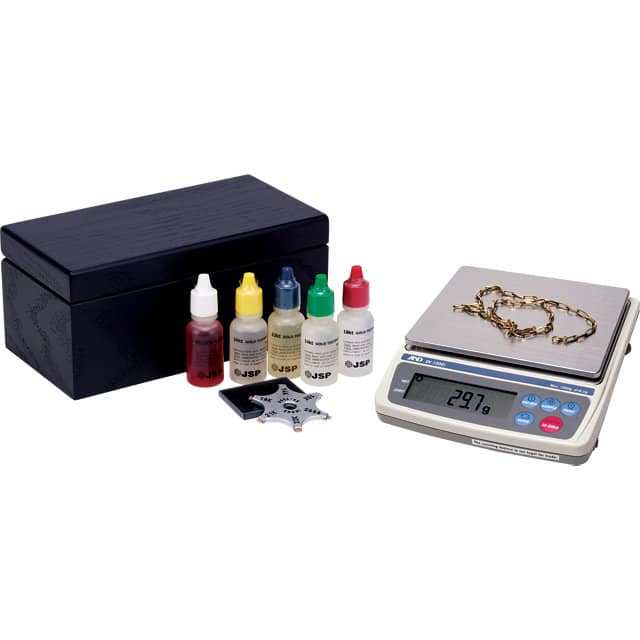
Perhaps the most commonly used test for gold testing over the counter is the scratch test. This process allows you to visually identify if a piece, when scratched on the stone, holds utilizing the 10K, 14K, 18K and 22K acid. This is a very popular and affordable option for everyday use with testing scrap gold and scrap silver. The complete kit sells for in the range of $80-100 for three acids, a stone and a nice wooden box to keep them in. Additional bottles of acid are also sold separately for about $3 to $4 per bottle.
Tricks of the Trade: A handy tip to testing silver that is quite popular involves using the 18K gold acid. When you scratch sterling on the stone and apply the 18K gold acid, the sterling will turn a milky blue. That’s how you know it is in fact Sterling Silver.
A few things to be careful of when using the Acid & Stone Scratch Test…
- Be sure to clean the stone thoroughly after every use. I’ve seen many shops that use gun oil to clean the surface while others just use a damp cloth. A popular method of cleaning is utilizing the 18K or 22K acid which helps clean the surface completely of any remaining scratch samples. Whatever you use, be sure it completely removes the scratches to avoid cross contamination for future testing.
- Speaking of cross contamination, using the acids properly also helps avoid this problem. I’ve been in a number of shops where I’ve seen pawnbrokers touching the tip of the bottle to the stone to test metal. You have to consider that little bottle like a turkey baster – when you squeeze, the acid will come out but when you release, it will suck up any liquid (and loose particles) it is in contact with. Having gold particles or acid drawn into your acid bottle will contaminate the acid and may cause your results to be skewed. I always recommend applying the acid by letting a drop fall onto your scratch area from about a half inch to a quarter of an inch above. This allows you to avoid contaminating your acid giving it a longer shelf life.
- When it comes to shelf life, the jury is still out. While many pawnbrokers will typically go through a bottle within a month, some will use them over the course of a few months. Knowing when to replenish your acid is key to ensure proper results. I always recommend writing the date you open a fresh bottle with a sharpie right on the bottle. Doing this will allow you to measure the time it takes you to swap out a new one. This will also help you avoid using old and stale acid which may be less potent and can affect your results. I always recommend tossing out open bottles after 3 months. For the cost of a bottle of acid, it’s worth the $3 cost when you’re taking in thousands of dollars in gold jewelry.
- For the best possible result, I recommend filing into the piece to get past any surface plating such as nickel plating. If you don’t file into the piece, you’re essentially rubbing the plating onto your stone and testing that which can give you a false reading. When you scrape off that plating, you have the ability to test the underlying metal which is what you want to reach for accurate results. For chains and heavy link bracelets, be sure to try a few links (not just one) and select links a few inches apart. When chains are repaired or extended, new links are often added. Unfortunately, the new links aren’t always the same karat. Testing a few links throughout the chain or silver bracelet will be your best bet to make sure you are getting what you are paying for. Be sure to test the first link at each end as most new links are added at the clasp.
Note: With the reemergence of the heavy Cuban Link Chains, it is always recommended to cut a link and test the middle. These heavy chains can mean thousands of dollars lost when taking in a plated or fake chain.
Testing using the stone and acid is very subjective and is truly a matter of practice. The more you do this, the better you become at discerning results. Be sure to give it a few seconds (not just a quick test and clean) to really let the acid do its job. Many times, you’ll notice the sample begins to fade away quickly while at times it can sit there for a while without any noticeable change.
Electronic Gold Testers
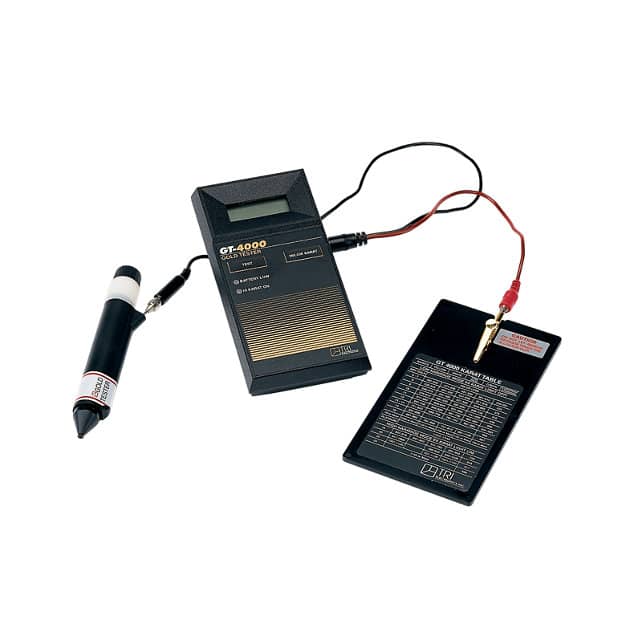
When it comes to electronic gold testers, you have many choices and with them, come options.
Perhaps the most popularly used tester in the market is the GemOro AuRACLE-3 Digital Gold and Platinum Metal Tester. This device gives you two test modes for Fast Test Yellow & Enhanced Mode and lets you test from 6K to 24K as well as platinum. Calibrating it is easy using a standard for 14K or 18K. The tester runs about $550 with the replacement pens (sold separately) being about $28. This unit’s ease of use and versatility is one of the reasons it’s so popular. Be sure to follow the instructions to ensure proper use and accurate results.
Going back a little further, the old school electronic unit is Tri Electronics GT-3000 (priced at around $230) and the slightly newer GT-4000 (priced around $350). These units have been around for many years and use no harmful chemicals or acids. The pen is refilled with the GXL Gel Tubes which cost about $24. It’s important to keep these refrigerated until use to extend their shelf life. When it comes to using this machine, it is also pretty easy. I always recommend avoiding contact with the gel and the prongs on the machine to avoid false readings.
SIDE NOTE: I’ve used these units myself when I was working at a gold buying company back in 2005-2010 before joining United PMR. We were testing over a million dollars a day in scrap using both the Acid & Stone Test as well as the Tri-Electronic testers and had great results when sending in lots for refining to our refiner (which happened to be United PMR).
As with any test, you want to make sure to scrape the piece at the point you’re looking to test then wipe it with a clean, damp cloth to remove any plating particles from the surface. Many folks clean the piece with rubbing alcohol before testing it which also seems to be quite effective.
For bullion testing, there is a great device out now that reads coins and bars with excellent reviews. The Sigma Precious Metal Verifier runs about $680 and has been popping up in more and more shops across the country. This unit allows you to:
- detect counterfeit coins and bars,
- measure underneath the surface, and
- read through slabs or numismatic cases.
NOTE: We have seen an increase in counterfeit bullion lately. Online sources such as wish.com are selling these fake bars and coins as well as fake jewelry all over the world. Unfortunately, people are using this fake material to deceive others who then end up coming to shops to pawn or sell these items.
You want to make sure you’re using your Sigma correctly to avoid any issues. The Sigma has a number of settings depending on the item you’re testing. If you fail to use the proper setting, you will get a false reading. Refer to the user manual for proper use and instructions.
XRF or X-Ray Fluorescence
In recent years and due largely to the gold rush we saw back in September 2011 when gold hit $1920.30 a T/oz., pawnbrokers and gold buyers began looking into more sophisticated ways of testing gold. The quest for near perfect results lead to the popularity of the XRF guns which are commonly used today in pawnshops. But how precise are these machines?
Once again, I must stress the importance of proper care and usage of the machine itself. While the x-ray gun appears to be a more precise method of testing, it is in fact contingent upon maintaining and using the equipment properly.
First and foremost, I always recommend having a few standards. A standard is a small piece of gold you can buy from your precious metals supplier (like United PMR) which is karated and provides you with a plumb sample to test. Most of the larger table top X-ray machines and some of the smaller hand-held units allow you to program the machine using standards. This is basically educating your x-ray – the more standards you use, the better off your machine will be at identifying the different elements in the pieces you are testing.
Once again, scraping the surface most definitely comes into play with the XRF test. This isn’t like an X-ray at the doctor’s office. This particular device isn’t looking deep but rather measuring the surface of the piece. Scraping and properly cleaning the surface is essential to get a true and accurate reading of the metal beneath any possible plating. Once again, the use of rubbing alcohol to clean the surface should help provide a more accurate reading.
When it comes to the piece, be sure to test a flat surface. Testing a ring, for example, is difficult because of the rounded nature of the piece. Try and focus the aim onto a flat surface to avoid the X-ray beams sliding off or bouncing off of the curved surface(s) which can in turn provide an incorrect reading.
Take your time and don’t cut corners. When it comes to testing with XRF, most units come with a set timeframe for each test. Some of the machines are set to 30 seconds while others are pre-set for 60 seconds. Don’t rush the test. Let the machine do its job. If you notice a huge change from start to finish, try testing another area.
I recommend testing various spots, not just one. On a chain, test various links along the chain and a few near the clasp. With melted bars or buttons, test both sides and test various locations. If you take your time and are precise with your procedures, this tool can be quite useful. However, it is important to note that it is not 100% accurate and is, as noted above, subject to user error.
SIDE NOTE: At primary precious metal refineries like United PMR, the XRF analysis is used solely for preliminary analysis. This is for determining and approximate value of your scrap lot for advances and is not utilized for determining final results or payout. Refiners will use a more precise scientific measure called a Fire Assay.